Posts tonen met het label linux. Alle posts tonen

zondag 23 november 2014

Installation of YAD on OUL 6.6

YAD on OUL 6.6

Recently I stumbled upon YAD (Yet Another Dialog) which is an improved version of Zenity. It has some major benefits compared to Zenity when you want to spice up your shell-scripts.
When trying to install it on OUL 6.6 I found out that the package was not available from the OracleYum repository so it has to be built it from source.

Extract the tar-file

[root@racnode1 ~]# tar xvf yad-0.24.0.tar.xz
yad-0.24.0/
yad-0.24.0/README
yad-0.24.0/missing
yad-0.24.0/COPYING
yad-0.24.0/TODO

Before installing yad you need to install 2 packages which are not installed in the basic-server installation from OUL.

- intltool.noarch

root@racnode1:~/yad-0.24.0 [root@racnode1 yad-0.24.0]# yum install intltool.noarch
Loaded plugins: security
Setting up Install Process
Resolving Dependencies
--> Running transaction check
...
---> Package libart_lgpl.x86_64 0:2.3.20-5.1.el6 will be installed
--> Finished Dependency Resolution
...
Installed:
  intltool.noarch 0:0.41.0-1.1.el6                                            

Dependency Installed:
  autoconf.noarch 0:2.63-5.1.el6          automake.noarch 0:1.11.1-4.el6    
  gettext-devel.x86_64 0:0.17-18.el6      gettext-libs.x86_64 0:0.17-18.el6  
  libart_lgpl.x86_64 0:2.3.20-5.1.el6     libgcj.x86_64 0:4.4.7-11.el6      

Complete!

- gtk2-devel.x86_64

root@racnode1 yad-0.24.0]# yum install gtk2-devel.x86_64
Loaded plugins: security Setting up Install Process Resolving Dependencies --> Running transaction check ---> Package gtk2-devel.x86_64 0:2.24.23-6.el6 will be installed ...
Installed: gtk2-devel.x86_64 0:2.24.23-6.el6
Dependency Installed:
  atk-devel.x86_64 0:1.30.0-1.el6
  cairo-devel.x86_64 0:1.8.8-3.1.el6
  fontconfig-devel.x86_64 0:2.8.0-5.el6
  freetype-devel.x86_64 0:2.3.11-14.el6_3.1
  gdk-pixbuf2-devel.x86_64 0:2.24.1-5.el6  
  glib2-devel.x86_64 0:2.28.8-4.el6
  libX11-devel.x86_64 0:1.6.0-2.2.el6
  libXau-devel.x86_64 0:1.0.6-4.el6
  libXcomposite-devel.x86_64 0:0.4.3-4.el6
  libXcursor-devel.x86_64 0:1.1.14-2.1.el6
  libXext-devel.x86_64 0:1.3.2-2.1.el6
  libXfixes-devel.x86_64 0:5.0.1-2.1.el6
  libXft-devel.x86_64 0:2.3.1-2.el6
  libXi-devel.x86_64 0:1.7.2-2.2.el6
  libXinerama-devel.x86_64 0:1.1.3-2.1.el6
  libXrandr-devel.x86_64 0:1.4.1-2.1.el6
  libXrender-devel.x86_64 0:0.9.8-2.1.el6
  libpng-devel.x86_64 2:1.2.49-1.el6_2
  libxcb-devel.x86_64 0:1.9.1-2.el6
  pango-devel.x86_64 0:1.28.1-10.0.1.el6
  pixman-devel.x86_64 0:0.32.4-4.el6
  xorg-x11-proto-devel.noarch 0:7.7-9.el6
  zlib-devel.x86_64 0:1.2.3-29.el6

Complete!

Now we can run ./configure and ./make and ./make install

[root@racnode1 yad-0.24.0]# ./configure
checking for a BSD-compatible install... /usr/bin/install -c
checking whether build environment is sane... yes
checking for a thread-safe mkdir -p... /bin/mkdir -p
checking for gawk... gawk
checking whether make sets $(MAKE)... yes
checking whether make supports nested variables... yes
checking whether to enable maintainer-specific portions of Makefiles... no
checking whether NLS is requested... yes
checking for style of include used by make... GNU
checking for gcc... gcc
checking whether the C compiler works... yes
...
config.status: creating config.h
config.status: executing depfiles commands
config.status: executing default-1 commands
config.status: executing po/stamp-it commands

Build icon browser - no

[root@racnode1 yad-0.24.0]# make
make  all-recursive
make[1]: Entering directory `/root/yad-0.24.0'
Making all in src
make[2]: Entering directory `/root/yad-0.24.0/src'
  CC       yad-about.o
  CC       yad-calendar.o
  CC       yad-color.o
  CC       yad-dnd.o
  CC       yad-entry.o
  CC       yad-file.o
  CC       yad-font.o
...
make[2]: Entering directory `/root/yad-0.24.0'
make[2]: Leaving directory `/root/yad-0.24.0'
make[1]: Leaving directory `/root/yad-0.24.0'

[root@racnode1 yad-0.24.0]# make install
Making install in src
make[1]: Entering directory `/root/yad-0.24.0/src'
make[2]: Entering directory `/root/yad-0.24.0/src'
 /bin/mkdir -p '/usr/local/bin'
  /usr/bin/install -c yad '/usr/local/bin'
make[2]: Nothing to be done for `install-data-am'.
make[2]: Leaving directory `/root/yad-0.24.0/src'
make[1]: Leaving directory `/root/yad-0.24.0/src'
Making install in po
make[1]: Entering directory `/root/yad-0.24.0/po'
linguas="de fr it pt_BR ru sk uk zh_TW "; \
        for lang in $linguas; do \
          dir=/usr/local/share/locale/$lang/LC_MESSAGES; \
          /bin/sh /root/yad-0.24.0/install-sh -d $dir; \
          if test -r $lang.gmo; then \
            /usr/bin/install -c -m 644 $lang.gmo $dir/yad.mo; \
            echo "installing $lang.gmo as $dir/yad.mo"; \
          else \
            /usr/bin/install -c -m 644 ./$lang.gmo $dir/yad.mo; \
            echo "installing ./$lang.gmo as" \
                 "$dir/yad.mo"; \
          fi; \
          if test -r $lang.gmo.m; then \
            /usr/bin/install -c -m 644 $lang.gmo.m $dir/yad.mo.m; \
            echo "installing $lang.gmo.m as $dir/yad.mo.m"; \
          else \
            if test -r ./$lang.gmo.m ; then \
              /usr/bin/install -c -m 644 ./$lang.gmo.m \
                $dir/yad.mo.m; \
              echo "installing ./$lang.gmo.m as" \
                   "$dir/yad.mo.m"; \
            else \
              true; \
            fi; \
          fi; \
        done
installing de.gmo as /usr/local/share/locale/de/LC_MESSAGES/yad.mo
installing fr.gmo as /usr/local/share/locale/fr/LC_MESSAGES/yad.mo
...

make[2]: Leaving directory `/root/yad-0.24.0'
make[1]: Leaving directory `/root/yad-0.24.0'
[root@racnode1 yad-0.24.0]#

[root@racnode1 ]# export DISPLAY=123.123.123.123:0.0
[root@racnode1 ]#./yad --color

Normally you should see a window pop up like below. 

Installation of Oracle Unbreakable Linux 6.6 on Virtual Box

Installation of Oracle Unbreakable Linux 6.6 on Virtual Box

Intro

This installation has been performed on VirtualBox 4.3.16 running on Win 7. Make sure that you have downloaded the OUL-iso from the Oracle Software Delivery Cloud prior to the installation . 

Create a vm in VirtualBox

Open VirutalBox and select Machine => New


Next give the vm a meaningfull name. This can be different from the actual hostname of the vm. Make sure that Type is Linux and Version is Oracle (64bit). 


Assing memory to the vm.


Select "Create a virtual hard drive now" and click Create.


Select VDI as file type and on the next screen select "Fixed Size"


Select 12G for the virtual hard drive and click Create.


The virtual hard drive will be created. This can take up several minuts depending on the hardware.


Now that the virtual machine is created we need to add a virtual cd/dvd. Right click on the vm and select settings.


Click on the "Add CD/DVD Device icon right of "Controller IDE " and select the iso downloaded from Oracle.


You can now start up the vm. The OUL installer will start up. Select "Install or upgrade an existing system"


Click "Next"


Select "English" and click "Next"


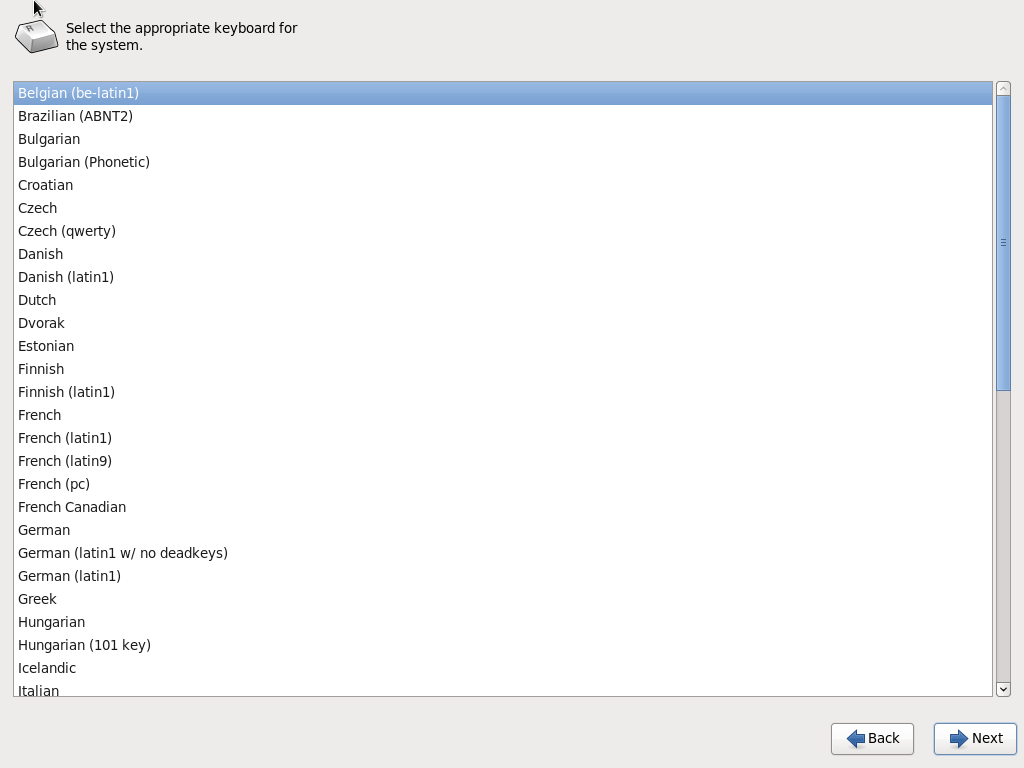
Select the appropriate keyboard-layout. I chose "Belgian BE Latin". Click "Next"


Select "Basic Storage Device" and click "Next"


 Select "Yes, Discard any data" ==> Next
 
 Hostname ==> racnode01.testdomain.com


Select the correct timezone and click "Next"


 Enter the password for the root-account.


 Select "Use All Space" and click "Next"


Select "Write changes to disk" ==> "Next"


 Select "Basic Server". If required you can install additional options later on. Click "Next"

The installation will start. This will take up 10-15 minutes.


zaterdag 25 oktober 2014

Configure hugepages on linux for Oracle


Introduction

Due to some performance issues with our Oracle RAC 11gR2 cluster running on OUL 5 we decided  to increase the physical memory of both nodes in our cluster from 24G to 96G each. The memory of our main production database was also increase from 14G to 48G per instance. Since we did not want to run into issues with regards to memory pages (default 4KB) we also introduced hugepages.

Steps

1 – After installing the memory in the server and rebooting check if all memory is visible from the OS


root [ ~ ]# dmidecode -t 17 | grep Size
        Size: 16384 MB
        Size: 16384 MB
        Size: 16384 MB
        Size: 16384 MB
        Size: 16384 MB
        Size: 16384 MB
        Size: No Module Installed
        Size: No Module Installed
        Size: No Module Installed
        Size: No Module Installed
        Size: No Module Installed
        Size: No Module Installed


2 – Next we need to figure out how much HugePages we need to reserve. To do this we have to check what the size is of a Hugepage. This is by default 2048 kB :

oracle [ ~ ]$ grep Hugepagesize /proc/meminfo
Hugepagesize:     2048 kB
oracle [ ~ ]$

We want to assign 48 Gig to our Oracle instance PRODDB2

ð  (48G * 1024) * 1024 è 50331648 (size in kB)
ð  50331648 / 2048  è 24576 (minimum nr of hugepages we need to configure)

The number of hugepages the os needs to reserve has to be configured in /etc/sysctl.conf

# HugePages
vm.nr_hugepages=24580

We configured 4 more hugepages then required….just in case
Next reload the /etc/sysctl.conf file using sysctl -p


sysctl –p


Check if the amount of hugepages is actually configured :


root [ ~ ]# grep Huge /proc/meminfo
HugePages_Total: 24580
HugePages_Free:  24580
HugePages_Rsvd:      0
Hugepagesize:     2048 kB


That's it ...now we can use HugePages.

maandag 13 oktober 2014

Increase the size of a LUN and Oracle ASM Disk without rebooting

How to increase the size of an oracle ASM-Diks without rebooting

1.       Increase the size of the LUN on your NAS

2.       Find the names of the block devices in question which should be rescanned. This is done by running the multipath command :

[root@node1 ~]# multipath –ll
oracle_db_data_lun01 (360002ac0000000005f00023e000046a1) dm-3 3PARdata,VV
[size=500G][features=0][hwhandler=0][rw]
\_ round-robin 0 [prio=0][active]
 \_ 0:0:1:247 sdab 65:176 [active][ready]
\_ round-robin 0 [prio=0][enabled]
 \_ 1:0:0:247 sdap 66:144 [active][ready]
\_ round-robin 0 [prio=0][enabled]
 \_ 1:0:1:247 sdbd 67:112 [active][ready]
\_ round-robin 0 [prio=0][enabled]
 \_ 0:0:0:247 sdn  8:208  [active][ready]
               
                The block devices are the names marked in red

3.       Write a 1 to the rescan-file of these block devices.

[root@node1 ~]# echo 1> /sys/block/sdab/device/rescan
[root@node1 ~]# echo 1> /sys/block/sdap/device/rescan
[root@node1 ~]# echo 1> /sys/block/sdbd/device/rescan
[root@node1 ~]# echo 1> /sys/block/sdn/device/rescan

Perform a partprobe to inform the OS about the changes.

[root@node1 ~]# partprobe

4.       Issue a resize of the multipath-device

[root@node1 ~]# multipathd -k
Multipathd> resize map oracle_db_data_lun_01

5.       Recreate the partition table using fdisk. First delete the partition and the create a new one.

[root@node1]# fdisk /dev/mapper/oracle_db_data_lun_01

The number of cylinders for this disk is set to 65270.
There is nothing wrong with that, but this is larger than 1024,
and could in certain setups cause problems with:
1) software that runs at boot time (e.g., old versions of LILO)
2) booting and partitioning software from other OSs
   (e.g., DOS FDISK, OS/2 FDISK)

Command (m for help): d
Selected partition 1

Command (m for help): u
Changing display/entry units to sectors

Command (m for help): n
Command action
   e   extended
   p   primary partition (1-4)
p
Partition number (1-4): 1
First sector (63-1048575999, default 63): 2048
Last sector or +size or +sizeM or +sizeK (2048-1048575999, default 1048575999):
Using default value 1048575999

Command (m for help): w
The partition table has been altered!

Calling ioctl() to re-read partition table.

WARNING: Re-reading the partition table failed with error 22: Invalid argument.
The kernel still uses the old table.
The new table will be used at the next reboot.
Syncing disks.

Next run kpartx to make the changes active :

[root@node1]# kpartx -a /dev/mapper/oracle_db_data_lun_01

6.       Finally we can change the size of the ASM-disk

[grid@node1 ~]$ sqlplus / as sysasm;

SQL*Plus: Release 11.2.0.4.0 Production on Mon Oct 13 12:24:15 2014

Copyright (c) 1982, 2013, Oracle.  All rights reserved.


Connected to:
Oracle Database 11g Enterprise Edition Release 11.2.0.4.0 - 64bit Production
With the Automatic Storage Management option

SQL> alter diskgroup ORA_DATA_DG1 resize disk ORA_DATA_DISK01 size 499G;

Diskgroup altered.

SQL>

maandag 6 oktober 2014

Installation of Cassandra on Debian Wheezy Linux

Installation of Cassandra on Debian Linux Wheezy

  • Open a terminal-session and connect as user root

  • edit the file /etc/apt/sources.list and add the following lines :
Installation of Cassandra on Debian Linux
  • connect as user root

  • edit /etc/apt/sources.list and add following lines :

deb http://www.apache.org/dist/cassandra/debian 21x main
deb-src http://www.apache.org/dist/cassandra/debian 21x main
  • Next perform the download with "apt-get update"

root@debian-vm01:/home/filip# vi /etc/apt/sources.list
root@debian-vm01:/home/filip# apt-get update
Ign cdrom://[Debian GNU/Linux 7.6.0 _Wheezy_ - Official amd64 DVD Binary-1 20140712-14:11] wheezy Release.gpg
Ign cdrom://[Debian GNU/Linux 7.6.0 _Wheezy_ - Official amd64 DVD Binary-1 20140712-14:11] wheezy Release
Ign cdrom://[Debian GNU/Linux 7.6.0 _Wheezy_ - Official amd64 DVD Binary-1 20140712-14:11] wheezy/contrib amd64 Packages/DiffIndex
Ign cdrom://[Debian GNU/Linux 7.6.0 _Wheezy_ - Official amd64 DVD Binary-1 20140712-14:11] wheezy/main amd64 Packages/DiffIndex
Ign cdrom://[Debian GNU/Linux 7.6.0 _Wheezy_ - Official amd64 DVD Binary-1 20140712-14:11] wheezy/contrib Translation-en_GB
Ign cdrom://[Debian GNU/Linux 7.6.0 _Wheezy_ - Official amd64 DVD Binary-1 20140712-14:11] wheezy/main Translation-en_GB
Hit http://security.debian.org wheezy/updates Release.gpg
Hit http://security.debian.org wheezy/updates Release
Get:1 http://www.apache.org 21x Release.gpg [819 B]
Hit http://security.debian.org wheezy/updates/main Sources
Get:2 http://www.apache.org 21x Release [2,301 B]
Ign http://www.apache.org 21x Release
Hit http://security.debian.org wheezy/updates/contrib Sources
Hit http://security.debian.org wheezy/updates/main amd64 Packages
Hit http://security.debian.org wheezy/updates/contrib amd64 Packages
Hit http://security.debian.org wheezy/updates/contrib Translation-en
Hit http://security.debian.org wheezy/updates/main Translation-en
Get:3 http://www.apache.org 21x/main Sources [631 B]
Get:4 http://www.apache.org 21x/main amd64 Packages [699 B]
Ign http://www.apache.org 21x/main Translation-en_GB
Ign http://www.apache.org 21x/main Translation-en
Fetched 4,450 B in 11s (370 B/s)
Reading package lists... Done
W: GPG error: http://www.apache.org 21x Release: The following signatures couldn't be verified because the public key is not available: NO_PUBKEY 749D6EEC0353B12C

The GPG-error can be solved by performing the following :

root@debian-vm01:/home/filip# gpg --keyserver pgp.mit.edu --recv-keys 749D6EEC0353B12C
gpg: directory `/root/.gnupg' created
gpg: new configuration file `/root/.gnupg/gpg.conf' created
gpg: WARNING: options in `/root/.gnupg/gpg.conf' are not yet active during this run
gpg: keyring `/root/.gnupg/secring.gpg' created
gpg: keyring `/root/.gnupg/pubring.gpg' created
gpg: requesting key 0353B12C from hkp server pgp.mit.edu
gpg: /root/.gnupg/trustdb.gpg: trustdb created
gpg: key 0353B12C: public key "T Jake Luciani <jake@apache.org>" imported
gpg: Total number processed: 1
gpg: imported: 1 (RSA: 1)
root@debian-vm01:/home/filip# gpg --export --armor 749D6EEC0353B12C | sudo apt-key add -
OK

Now you can perform the apt-get update again :

root@debian-vm01:/home/filip# apt-get update 
Ign cdrom://[Debian GNU/Linux 7.6.0 _Wheezy_ - Official amd64 DVD Binary-1 20140712-14:11] wheezy Release.gpg
Ign cdrom://[Debian GNU/Linux 7.6.0 _Wheezy_ - Official amd64 DVD Binary-1 20140712-14:11] wheezy Release
Ign cdrom://[Debian GNU/Linux 7.6.0 _Wheezy_ - Official amd64 DVD Binary-1 20140712-14:11] wheezy/contrib amd64 Packages/DiffIndex
Ign cdrom://[Debian GNU/Linux 7.6.0 _Wheezy_ - Official amd64 DVD Binary-1 20140712-14:11] wheezy/main amd64 Packages/DiffIndex
Ign cdrom://[Debian GNU/Linux 7.6.0 _Wheezy_ - Official amd64 DVD Binary-1 20140712-14:11] wheezy/contrib Translation-en_GB
Ign cdrom://[Debian GNU/Linux 7.6.0 _Wheezy_ - Official amd64 DVD Binary-1 20140712-14:11] wheezy/main Translation-en_GB
Get:1 http://www.apache.org 21x Release.gpg [819 B]
Hit http://security.debian.org wheezy/updates Release.gpg
Hit http://www.apache.org 21x Release
Hit http://security.debian.org wheezy/updates Release
Hit http://security.debian.org wheezy/updates/main Sources
Hit http://www.apache.org 21x/main Sources
Hit http://security.debian.org wheezy/updates/contrib Sources
Hit http://www.apache.org 21x/main amd64 Packages
Hit http://security.debian.org wheezy/updates/main amd64 Packages
Hit http://security.debian.org wheezy/updates/contrib amd64 Packages
Hit http://security.debian.org wheezy/updates/contrib Translation-en
Hit http://security.debian.org wheezy/updates/main Translation-en
Ign http://www.apache.org 21x/main Translation-en_GB
Ign http://www.apache.org 21x/main Translation-en
Fetched 819 B in 9s (89 B/s)
Reading package lists... Done


  • Now you can install cassandra with "apt-get install cassandra"


root@debian-vm01:/home/filip# apt-get install cassandra
Reading package lists... Done
Building dependency tree
Reading state information... Done
The following extra packages will be installed:
libopts25 ntp openjdk-7-jre-headless
Suggested packages:
cassandra-tools ntp-doc icedtea-7-jre-jamvm sun-java6-fonts fonts-ipafont-gothic fonts-ipafont-mincho
ttf-wqy-microhei ttf-wqy-zenhei ttf-indic-fonts
The following NEW packages will be installed:
...
[ ok ] Starting NTP server: ntpd.
Setting up openjdk-7-jre-headless:amd64 (7u65-2.5.1-5~deb7u1) ...
Setting up cassandra (2.1.0-2) ...
Adding group `cassandra' (GID 124) ...
Done.
vm.max_map_count = 1048575
net.ipv4.tcp_keepalive_time = 300
Cassandra 2.0 and later require Java 7u25 or later.
invoke-rc.d: initscript cassandra, action "start" failed.
dpkg: error processing cassandra (--configure):
subprocess installed post-installation script returned error exit status 1
Processing triggers for python-support ...
Errors were encountered while processing:
cassandra
E: Sub-process /usr/bin/dpkg returned an error code (1)

So we got an error which I got because the jre is outdated....So first I have installed Java 8u5

root@debian-vm01:/home/filip# wget --header "Cookie: oraclelicense=accept-securebackup-cookie" http://download.oracle.com/otn-pub/java/jdk/8u5-b13/jdk-8u5-linux-x64.tar.gz
--2014-10-05 20:56:58-- http://download.oracle.com/otn-pub/java/jdk/8u5-b13/jdk-8u5-linux-x64.tar.gz
Resolving download.oracle.com (download.oracle.com)... 2.22.55.145, 2.22.55.185
Connecting to download.oracle.com (download.oracle.com)|2.22.55.145|:80... connected.
HTTP request sent, awaiting response... 302 Moved Temporarily
Location: https://edelivery.oracle.com/otn-pub/java/jdk/8u5-b13/jdk-8u5-linux-x64.tar.gz [following]
--2014-10-05 20:57:06-- https://edelivery.oracle.com/otn-pub/java/jdk/8u5-b13/jdk-8u5-linux-x64.tar.gz
...
100%
root@debian-vm01:/home/filip# mkdir /opt/java
root@debian-vm01:/home/filip# cd /opt/java
root@debian-vm01:/opt/java# tar xvf /home/filip/jdk-8u5-linux-x64.tar.gz
root@debian-vm01:/opt/java# cd jdk1.8.0_05/
root@debian-vm01:/opt/java/jdk1.8.0_05# java -version
java version "1.6.0_32"
OpenJDK Runtime Environment (IcedTea6 1.13.4) (6b32-1.13.4-1~deb7u1)
OpenJDK 64-Bit Server VM (build 23.25-b01, mixed mode)
root@debian-vm01:/opt/java/jdk1.8.0_05# cd bin
root@debian-vm01:/opt/java/jdk1.8.0_05/bin# ./java -version
java version "1.8.0_05"
Java(TM) SE Runtime Environment (build 1.8.0_05-b13)
Java HotSpot(TM) 64-Bit Server VM (build 25.5-b02, mixed mode)
root@debian-vm01:/opt/java/jdk1.8.0_05/bin# update-alternatives --install /usr/bin/java java /opt/java/jdk1.8.0_05/bin/java 100
root@debian-vm01:/opt/java/jdk1.8.0_05/bin# update-alternatives --install /usr/bin/java java /opt/java/jdk1.8.0_05/bin/javac 100
root@debian-vm01:/opt/java/jdk1.8.0_05/bin# update-alternatives --display java
java - auto mode
link currently points to /usr/lib/jvm/java-6-openjdk-amd64/jre/bin/java
/opt/java/jdk1.8.0_05/bin/java - priority 100
/opt/java/jdk1.8.0_05/bin/javac - priority 100
/usr/lib/jvm/java-6-openjdk-amd64/jre/bin/java - priority 1061
slave java.1.gz: /usr/lib/jvm/java-6-openjdk-amd64/jre/man/man1/java.1.gz
/usr/lib/jvm/java-7-openjdk-amd64/jre/bin/java - priority 1051
slave java.1.gz: /usr/lib/jvm/java-7-openjdk-amd64/jre/man/man1/java.1.gz
Current 'best' version is '/usr/lib/jvm/java-6-openjdk-amd64/jre/bin/java'.
root@debian-vm01:/opt/java/jdk1.8.0_05/bin# update-alternatives --remove java /usr/lib/jvm/java-6-openjdk-amd64/jre/bin/java
update-alternatives: using /usr/lib/jvm/java-7-openjdk-amd64/jre/bin/java to provide /usr/bin/java (java) in auto mode
root@debian-vm01:/opt/java/jdk1.8.0_05/bin# java -version
java version "1.7.0_65"
OpenJDK Runtime Environment (IcedTea 2.5.1) (7u65-2.5.1-5~deb7u1)
OpenJDK 64-Bit Server VM (build 24.65-b04, mixed mode)


  • Now we can startup cassandra :


root@debian-vm01:/opt/java/jdk1.8.0_05/bin# service cassandra status
[ ok ] Cassandra is not running.
root@debian-vm01:/opt/java/jdk1.8.0_05/bin# service cassandra start
root@debian-vm01:/opt/java/jdk1.8.0_05/bin# service cassandra status
[ ok ] Cassandra is running.

Next up I'll dig a bit deeper into the architecture of cassandra. Feel free to comment :-)

zaterdag 4 oktober 2014

Installing Debian on Oracle VirtualBox

Installing Debian Linux on Oracle Virtualbox

Some experimentation done with Debian Linux on Oracle Virtualbox running on top of Win7. Oracle Virtualbox provides the perfect sandbox to play around. This complete installation will tape approx 1h to complete depending on the specifications of the host-server.

First, start of with creating a new virtual machine in Oracle Virtualbox. Start-up Oracle VM VirtualBox and click  on "New"


The "Create Virtual Machine" wizard will popup. Give the vm a meaningfull name like "Debian_Linux_VM". Type will be Linux and Version Debian (64bit). Click "Next"


The vm will be configured with 512 MB for this test. Click "Next"


 On the next screen select 'Create a virtual hard drive now' and click "Next"


 As Hard drive file type leave the default "VDI" and click "Next"


Select Fixed size and click "Next".

!! Be aware that you cannot resize a disk with fixed size after creation !!


Choose the size of the virtual hd (Here we choose 4GB). Click "Next"


Click Create and the virtual machine will be created :


 When the vm is created it will be powered off. We now need to attach the Debian installation cd to the virtual machine so we can perform the actual installation.

Select the virtual machine and click on Settings. In the settings window select Storage and then "Add CD/DVD drive"

 Select Choose disk


Select the file 'debian-7.6.0-amd64-DVD-1.iso'. The installation files can be obained at

http://cdimage.debian.org/debian-cd/7.6.0/amd64/bt-cd/


Check if the iso file is loaded and click 'OK'


Now we are ready to start the virtual machine up and perform the actual installation of Debian Linux . Select the vm and click on Start.


The following screen will appear. Select Install


First the default language needs to be selected. Here we'll go for english


 Next the territory....


 And the keyboard-layout


 On the following screen you need to enter the hostname which you will use.


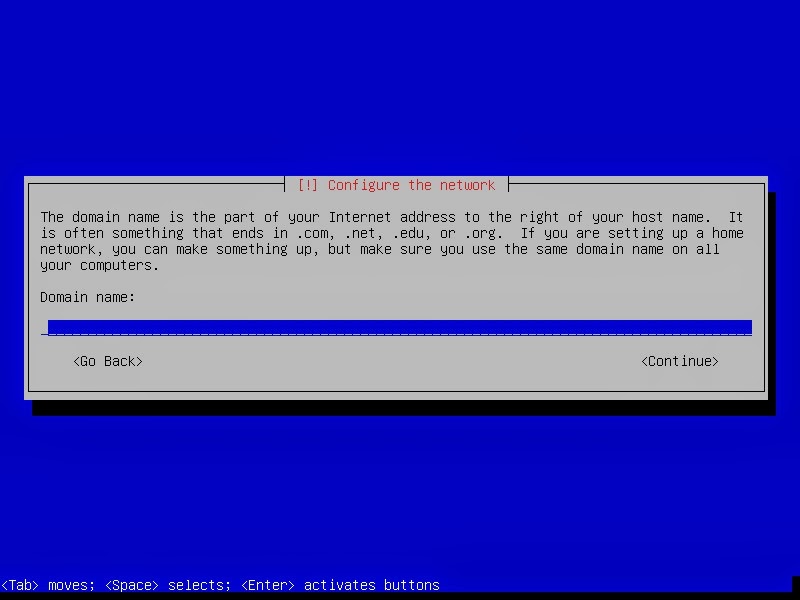
For the purpose of our testing we are not going to provide a domain-name...so leave this blank


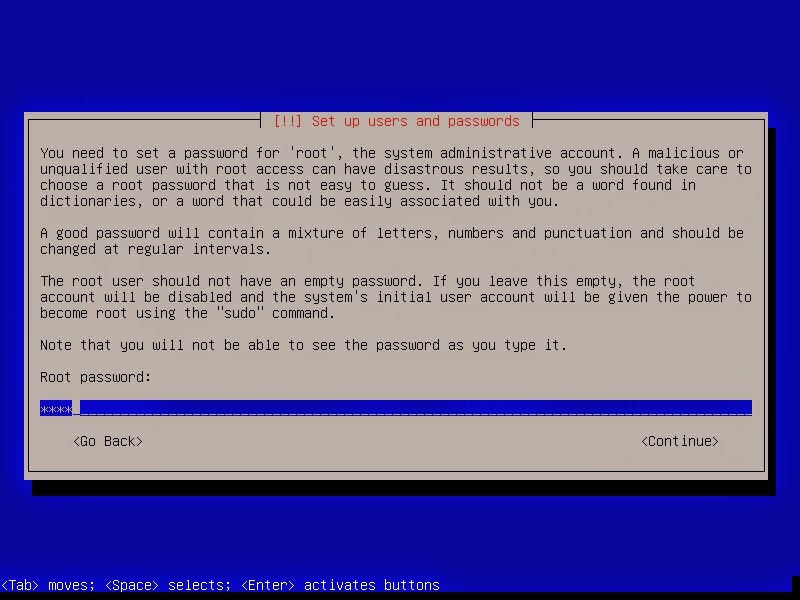
Enter a password for the root account.


The next couple of screens is used to create a normal user account....


The installer can use the entire virtual hd... so select the option "Guided - use entire disk"


Select "All files in one partition..."


"Finish partitioning and write changes to disk"


"Yes"


Select "No"


Select "No"


Also select "Debian descktop environment"...


Now the actual installation will take place....this will take a while


Install GRUB boot loader....


After this step the virtual machine is installed and can be used...select "Continue"

And Debian is starting up... :-)

and running....