all things DBA has moved to
==> http://alllinuxdba.wordpress.com <==
woensdag 26 november 2014
zondag 23 november 2014
Installation of YAD on OUL 6.6
YAD on OUL 6.6
Recently I stumbled upon YAD (Yet Another Dialog) which is an improved version of Zenity. It has some major benefits compared to Zenity when you want to spice up your shell-scripts.
When trying to install it on OUL 6.6 I found out that the package was not available from the OracleYum repository so it has to be built it from source.
When trying to install it on OUL 6.6 I found out that the package was not available from the OracleYum repository so it has to be built it from source.
Extract the tar-file
[root@racnode1 ~]# tar xvf yad-0.24.0.tar.xz
yad-0.24.0/
yad-0.24.0/README
yad-0.24.0/missing
yad-0.24.0/COPYING
yad-0.24.0/TODO
yad-0.24.0/
yad-0.24.0/README
yad-0.24.0/missing
yad-0.24.0/COPYING
yad-0.24.0/TODO
Before installing yad you need to install 2 packages which are not installed in the basic-server installation from OUL.
- intltool.noarch
root@racnode1:~/yad-0.24.0 [root@racnode1 yad-0.24.0]# yum install intltool.noarch
Loaded plugins: security
Setting up Install Process
Resolving Dependencies
--> Running transaction check
...
---> Package libart_lgpl.x86_64 0:2.3.20-5.1.el6 will be installed
--> Finished Dependency Resolution
...
Installed:
intltool.noarch 0:0.41.0-1.1.el6
Dependency Installed:
autoconf.noarch 0:2.63-5.1.el6 automake.noarch 0:1.11.1-4.el6
gettext-devel.x86_64 0:0.17-18.el6 gettext-libs.x86_64 0:0.17-18.el6
libart_lgpl.x86_64 0:2.3.20-5.1.el6 libgcj.x86_64 0:4.4.7-11.el6
Complete!
- gtk2-devel.x86_64
root@racnode1 yad-0.24.0]# yum install gtk2-devel.x86_64
Loaded plugins: security Setting up Install Process Resolving Dependencies --> Running transaction check ---> Package gtk2-devel.x86_64 0:2.24.23-6.el6 will be installed ...
Installed: gtk2-devel.x86_64 0:2.24.23-6.el6
Dependency Installed:
atk-devel.x86_64 0:1.30.0-1.el6
cairo-devel.x86_64 0:1.8.8-3.1.el6
fontconfig-devel.x86_64 0:2.8.0-5.el6
freetype-devel.x86_64 0:2.3.11-14.el6_3.1
gdk-pixbuf2-devel.x86_64 0:2.24.1-5.el6
glib2-devel.x86_64 0:2.28.8-4.el6
libX11-devel.x86_64 0:1.6.0-2.2.el6
libXau-devel.x86_64 0:1.0.6-4.el6
libXcomposite-devel.x86_64 0:0.4.3-4.el6
libXcursor-devel.x86_64 0:1.1.14-2.1.el6
libXext-devel.x86_64 0:1.3.2-2.1.el6
libXfixes-devel.x86_64 0:5.0.1-2.1.el6
libXft-devel.x86_64 0:2.3.1-2.el6
libXi-devel.x86_64 0:1.7.2-2.2.el6
libXinerama-devel.x86_64 0:1.1.3-2.1.el6
libXrandr-devel.x86_64 0:1.4.1-2.1.el6
libXrender-devel.x86_64 0:0.9.8-2.1.el6
libpng-devel.x86_64 2:1.2.49-1.el6_2
libxcb-devel.x86_64 0:1.9.1-2.el6
pango-devel.x86_64 0:1.28.1-10.0.1.el6
pixman-devel.x86_64 0:0.32.4-4.el6
xorg-x11-proto-devel.noarch 0:7.7-9.el6
zlib-devel.x86_64 0:1.2.3-29.el6
Complete!
Now we can run ./configure and ./make and ./make install
[root@racnode1 yad-0.24.0]# ./configure
checking for a BSD-compatible install... /usr/bin/install -c
checking whether build environment is sane... yes
checking for a thread-safe mkdir -p... /bin/mkdir -p
checking for gawk... gawk
checking whether make sets $(MAKE)... yes
checking whether make supports nested variables... yes
checking whether to enable maintainer-specific portions of Makefiles... no
checking whether NLS is requested... yes
checking for style of include used by make... GNU
checking for gcc... gcc
checking whether the C compiler works... yes
...
config.status: creating config.h
config.status: executing depfiles commands
config.status: executing default-1 commands
config.status: executing po/stamp-it commands
Build icon browser - no
[root@racnode1 yad-0.24.0]# make
make all-recursive
make[1]: Entering directory `/root/yad-0.24.0'
Making all in src
make[2]: Entering directory `/root/yad-0.24.0/src'
CC yad-about.o
CC yad-calendar.o
CC yad-color.o
CC yad-dnd.o
CC yad-entry.o
CC yad-file.o
CC yad-font.o
...
make[2]: Entering directory `/root/yad-0.24.0'
make[2]: Leaving directory `/root/yad-0.24.0'
make[1]: Leaving directory `/root/yad-0.24.0'
[root@racnode1 yad-0.24.0]# make install
Making install in src
make[1]: Entering directory `/root/yad-0.24.0/src'
make[2]: Entering directory `/root/yad-0.24.0/src'
/bin/mkdir -p '/usr/local/bin'
/usr/bin/install -c yad '/usr/local/bin'
make[2]: Nothing to be done for `install-data-am'.
make[2]: Leaving directory `/root/yad-0.24.0/src'
make[1]: Leaving directory `/root/yad-0.24.0/src'
Making install in po
make[1]: Entering directory `/root/yad-0.24.0/po'
linguas="de fr it pt_BR ru sk uk zh_TW "; \
for lang in $linguas; do \
dir=/usr/local/share/locale/$lang/LC_MESSAGES; \
/bin/sh /root/yad-0.24.0/install-sh -d $dir; \
if test -r $lang.gmo; then \
/usr/bin/install -c -m 644 $lang.gmo $dir/yad.mo; \
echo "installing $lang.gmo as $dir/yad.mo"; \
else \
/usr/bin/install -c -m 644 ./$lang.gmo $dir/yad.mo; \
echo "installing ./$lang.gmo as" \
"$dir/yad.mo"; \
fi; \
if test -r $lang.gmo.m; then \
/usr/bin/install -c -m 644 $lang.gmo.m $dir/yad.mo.m; \
echo "installing $lang.gmo.m as $dir/yad.mo.m"; \
else \
if test -r ./$lang.gmo.m ; then \
/usr/bin/install -c -m 644 ./$lang.gmo.m \
$dir/yad.mo.m; \
echo "installing ./$lang.gmo.m as" \
"$dir/yad.mo.m"; \
else \
true; \
fi; \
fi; \
done
installing de.gmo as /usr/local/share/locale/de/LC_MESSAGES/yad.mo
installing fr.gmo as /usr/local/share/locale/fr/LC_MESSAGES/yad.mo
...
make[2]: Leaving directory `/root/yad-0.24.0'
make[1]: Leaving directory `/root/yad-0.24.0'
[root@racnode1 yad-0.24.0]#
[root@racnode1 ]# export DISPLAY=123.123.123.123:0.0
[root@racnode1 ]#./yad --color
Normally you should see a window pop up like below.

Installation of Oracle Unbreakable Linux 6.6 on Virtual Box
Installation of Oracle Unbreakable Linux 6.6 on Virtual Box
Intro
This installation has been performed on VirtualBox 4.3.16 running on Win 7. Make sure that you have downloaded the OUL-iso from the Oracle Software Delivery Cloud prior to the installation .
Create a vm in VirtualBox
Open VirutalBox and select Machine => New

Next give the vm a meaningfull name. This can be different from the actual hostname of the vm. Make sure that Type is Linux and Version is Oracle (64bit).

Assing memory to the vm.

Select "Create a virtual hard drive now" and click Create.

Select VDI as file type and on the next screen select "Fixed Size"


Select 12G for the virtual hard drive and click Create.

The virtual hard drive will be created. This can take up several minuts depending on the hardware.

Now that the virtual machine is created we need to add a virtual cd/dvd. Right click on the vm and select settings.

Click on the "Add CD/DVD Device icon right of "Controller IDE " and select the iso downloaded from Oracle.


You can now start up the vm. The OUL installer will start up. Select "Install or upgrade an existing system"

Click "Next"

Select "English" and click "Next"

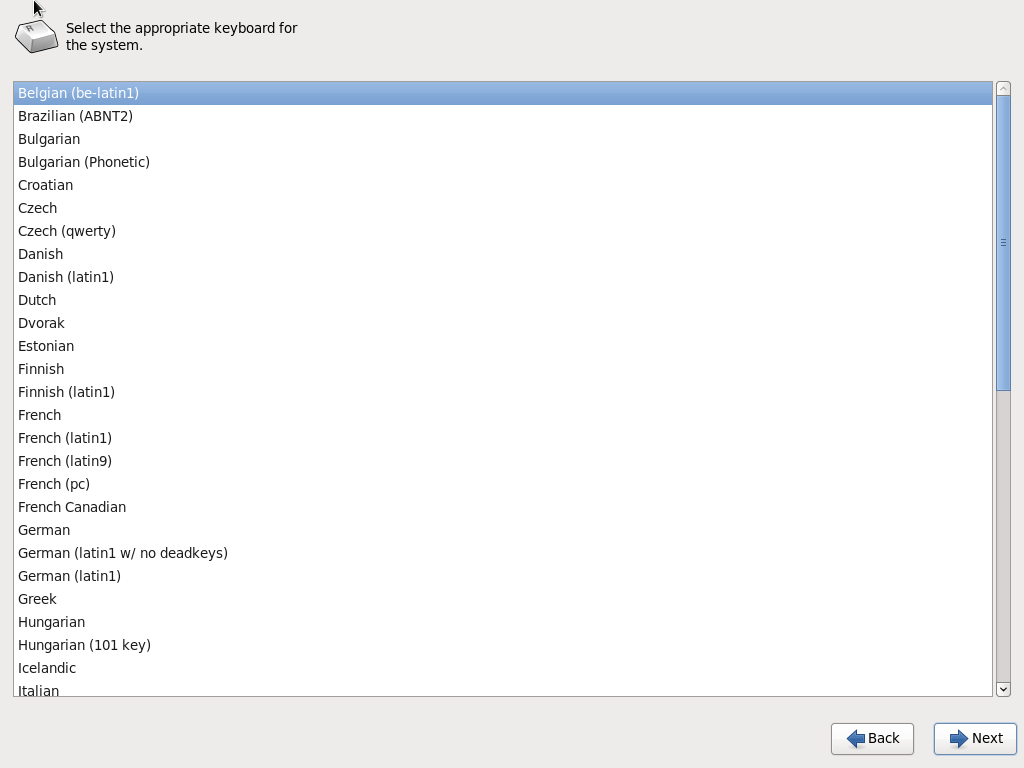
Select the appropriate keyboard-layout. I chose "Belgian BE Latin". Click "Next"
Select "Basic Storage Device" and click "Next"

Select "Yes, Discard any data" ==> Next


Select the correct timezone and click "Next"

Enter the password for the root-account.


Select "Write changes to disk" ==> "Next"


vrijdag 7 november 2014
"ORA-29024: Certificate validation failure" when calling https-site with utl_http
Problem when using UTL_HTTP for HTTPS-sites
When using the UTL_HTTP-package for accessing https-sites you might get the errorORA-29024: Certificate validation failure – message
SQL> select utl_http.request ('https://www.ssllabs.com/ssltest');
select utl_http.request ('https://www.ssllabs.com/ssltest') from dual
*
ERROR at line 1:
ORA-29273: HTTP request failed
ORA-06512: at "SYS.UTL_HTTP", line 1722
ORA-29024: Certificate validation failure
ORA-06512: at line 1
To avoid this you need to configure an Oracle Wallet :
Retrieve the certificate from the site. In Chrome click on the lock-icon :

A popup-screen will appear. Click on the Connection-tab and then on ‘Certificate information’

On the certificate-screen select the Details-tab and click on the ‘Copy to File…’ button

The ‘Certificate Export Wizard’ will start up. Click ‘Next’

Select ‘Cryptographic Message Syntax .. – PKCS #7’. The format might depend on the site you are accessing.

Select where to store the certificate and click ‘Next’.


Copy the certificate-file to the server hosting the Oracle database.
Next we need to create a wallet :
orapki wallet create -wallet /u01/app/oracle/admin/DB1/wallet -pwd Password -auto_login
and add the certificate to the wallet :
oracle [ /u01/app/oracle/admin/DB1/wallet ]$ orapki wallet add -wallet /u01/app/oracle/admin/DB1/wallet -trusted_cert -cert /tmp/ssllabs.p7b -pwd Password
Oracle PKI Tool : Version 11.2.0.3.0 - Production
Copyright (c) 2004, 2011, Oracle and/or its affiliates. All rights reserved.
oracle [ /u01/app/oracle/admin/DB1/wallet ]$
Now we can test if the we can access the site :
SQL> select utl_http.request ('https://www.ssllabs.com/ssltest',NULL,'file:/u01/app/oracle/admin/DB1/wallet','Password') from dual;
<!DOCTYPE html PUBLIC "-//W3C//DTD XHTML 1.0 Transitional//EN"
"http://www.w3.org/TR/xhtml1/DTD/xhtml1-transitional.dtd">
<html>
<head>
<title>Qualys SSL Labs - Projects / SSL Server Test</title>
…
SQL>
And it works :-)
zaterdag 25 oktober 2014
Configure hugepages on linux for Oracle
Introduction
Due to some
performance issues with our Oracle RAC 11gR2 cluster running on OUL 5 we decided to increase the physical memory of both nodes
in our cluster from 24G to 96G each. The memory of our main production database
was also increase from 14G to 48G per instance. Since we did not want to run
into issues with regards to memory pages (default 4KB) we also introduced
hugepages.
Steps
1 – After installing
the memory in the server and rebooting check if all memory is visible from the
OS
root [ ~ ]# dmidecode -t 17 | grep Size
Size: 16384 MB
Size: 16384 MB
Size: 16384 MB
Size: 16384 MB
Size: 16384 MB
Size: 16384 MB
Size: No Module Installed
Size: No Module Installed
Size: No Module Installed
Size: No Module Installed
Size: No Module Installed
Size: No Module Installed
2 – Next we need to figure out how
much HugePages we need to reserve. To do this we have to check what the size is
of a Hugepage. This is by default 2048 kB :
oracle [ ~ ]$ grep Hugepagesize /proc/meminfo
Hugepagesize: 2048 kB
oracle [ ~ ]$
We want to
assign 48 Gig to our Oracle instance PRODDB2
ð (48G * 1024) * 1024 è 50331648 (size in kB)
ð 50331648 / 2048 è 24576 (minimum nr of hugepages we
need to configure)
The number of hugepages the os needs to reserve has to be configured in /etc/sysctl.conf
# HugePages
vm.nr_hugepages=24580
We configured 4 more hugepages then required….just
in case
Next reload the /etc/sysctl.conf file using
sysctl -p
sysctl –p
Check if the amount of hugepages is actually
configured :
root [ ~ ]# grep Huge /proc/meminfo
HugePages_Total: 24580
HugePages_Free: 24580
HugePages_Rsvd: 0
Hugepagesize: 2048 kB
That's it ...now we can use HugePages.
donderdag 23 oktober 2014
How to create a physical standby database
Assumptions
This document has been tested on OUL 5 with Oracle 11.2.0.2 and 11.2.0.3The Primary database PRIMARY_DB is in archivelog-mode and force-logging is enabled. This database is running on node1.
The Physical standby database is STANDBY_DB and runs on node2
Configuration
On Primary database
Set following parameters :
ALTER SYSTEM SET log_archive_config='DG_CONFIG=(PRIMARY_DB,STANDBY_DB)';ALTER SYSTEM SET log_archive_dest_1='LOCATION=+ORA_FRA_DG1 VALID_FOR=(ALL_LOGFILES,ALL_ROLES) DB_UNIQUE_NAME=PRIMARY_DB';ALTER SYSTEM SET log_archive_dest_2='SERVICE=STANDBY_DB NOAFFIRM ASYNC VALID_FOR=(ONLINE_LOGFILES,PRIMARY_ROLE) DB_UNIQUE_NAME=STANDBY_DB' SCOPE=MEMORY;ALTER SYSTEM SET log_archive_dest_state_1='ENABLE';ALTER SYSTEM SET fal_server='STANDBY_DB';ALTER SYSTEM SET fal_client='PRIMARY_DB';ALTER SYSTEM SET standby_file_management='AUTO' SCOPE=MEMORY; |
Make sure that all required entries are present in the tnsnames.ora file on BOTH servers :
PRIMARY_DB = (DESCRIPTION = (ADDRESS_LIST = (ADDRESS = (COMMUNITY = tcp.world)(PROTOCOL = TCP)(Host = node1)(Port = 1521)) ) (CONNECT_DATA = (SERVICE_NAME = PRIMARY_DB) ) )STANDBY_DB = (DESCRIPTION = (ADDRESS_LIST = (ADDRESS = (COMMUNITY = tcp.world)(PROTOCOL = TCP)(Host = node2)(Port = 1521)) ) (CONNECT_DATA = (SERVICE_NAME = STANDBY_DB ) ) ) |
Check connectivity using tnsping. Also make sure that the the tnsnames in the GRID-home has all required entries.
Put following entries in the listener.ora and restart the listener. The listener.ora on standby_server should have following 2 blocks. The second block is required for the dgmrl :
(SID_DESC = (GLOBAL_DBNAME = STANDBY_DB ) (ORACLE_HOME = /u01/app/oracle/product/11.2.0.3/db_1) (SID_NAME = FLEETTST_STBY))(SID_DESC = (GLOBAL_DBNAME = STANDBY_DB_DGMGRL) (ORACLE_HOME = /u01/app/oracle/product/11.2.0.3/db_1) (SID_NAME = FLEETTST_STBY)) |
Reload the listener on the standby server
[oracle@node2 admin]$ su - gridPassword:[grid@node2 ~]$ . oraenvORACLE_SID = [grid] ? +ASMThe Oracle base has been set to /u01/app/oracle[grid@node2 ~]$ lsnrctl reload listenerLSNRCTL for Linux: Version 11.2.0.4.0 - Production on 14-MAR-2014 15:42:39Copyright (c) 1991, 2013, Oracle. All rights reserved.Connecting to (DESCRIPTION=(ADDRESS=(PROTOCOL=TCP)(HOST=dbnode5)(PORT=1521)))The command completed successfully[grid@node2 ~]$ |
Copy the password-file from the source database to the standby-database and rename the file to reflect the SID of the standby database :
On the primary_server
On the standby_server
create an initial init.ora file for the standby database with the following content. Make sure that the DB_BLOCK_SIZE is the same as on the primary-database :
And startup the database in nomount mode :
SQL> startup nomount pfile=’?/dbs/initSTANDBY_DB.ora’ |
Create the standby database using rman :
rman target sys/<Password>@PRIMARY_DB auxiliary sys/<Password>@STANDBY_DBrmanrun {allocate channel prmy1 type disk;allocate channel prmy2 type disk;allocate channel prmy3 type disk;allocate channel prmy4 type disk;allocate auxiliary channel stby type disk;duplicate target database for standby from active databasespfile parameter_value_convert 'PRIMARY_DB','STANDBY_DB' set db_create_file_dest='+ORA_DATA_DG_DG1' set db_create_online_log_dest_1='+ORA_REDO_DG_DG1' set db_create_online_log_dest_2='+ORA_FRA_DG_DG1' set db_recovery_file_dest='+ORA_FRA_DG_DG1' set db_unique_name='STANDBY_DB' set db_file_name_convert='+ORA_DATA_DG1','+ORA_DATA_DG_DG1' set log_file_name_convert='+ORA_REDO_DG1','+ORA_REDO_DG_DG1' set control_files='+ORA_DATA_DG_DG1','+ORA_FRA_DG_DG1' set log_archive_max_processes='5' set fal_client='STANDBY_DB' set fal_server='PRIMARY_DB' set standby_file_management='AUTO' set log_archive_config='dg_config=(PRIMARY_DB,STANDBY_DB)' set log_archive_dest_1='LOCATION=+ORA_FRA_DG_DG1 VALID_FOR=(ALL_LOGFILES,ALL_ROLES) DB_UNIQUE_NAME=STANDBY_DB' set log_archive_dest_2='service=PRIMARY_DB ASYNC valid_for=(ONLINE_LOGFILE,PRIMARY_ROLE) db_unique_name=PRIMARY_DB';}Example used to create rcat_stby :run {allocate channel prmy1 type disk;allocate channel prmy2 type disk;allocate channel prmy3 type disk;allocate channel prmy4 type disk;allocate auxiliary channel stby type disk;duplicate target database for standby from active databasespfile parameter_value_convert 'RCAT','RCAT_STBY' set db_create_file_dest='+ORA_DATA_DG_DG1' set db_recovery_file_dest='+ORA_FRA_DG_DG1' set db_unique_name='RCAT_STBY' set db_file_name_convert='+ORA_DATA_DG1','+ORA_DATA_DG_DG1' set log_file_name_convert='+ORA_REDO_DG1','+ORA_REDO_DG_DG1','+ORA_FRA_DG1','+ORA_FRA_DG_DG1' set log_archive_max_processes='5' set fal_client='RCAT_STBY' set fal_server='RCAT' set standby_file_management='AUTO' set log_archive_config='dg_config=(RCAT,RCAT_STBY)' set log_archive_dest_1='LOCATION=+ORA_FRA_DG_DG1 VALID_FOR=(ALL_LOGFILES,ALL_ROLES) DB_UNIQUE_NAME=RCAT_STBY' set log_archive_dest_2='service=RCAT ASYNC valid_for=(ONLINE_LOGFILE,PRIMARY_ROLE) db_unique_name=RCAT' set control_files='+ORA_DATA_DG_DG1' set db_create_online_log_dest_1='+ORA_REDO_DG_DG1' set db_create_online_log_dest_2='+ORA_FRA_DG_DG1' ;} |
When the above is finished the standby database should be created. Last step is to start up the apply process :
SQL>alter database recover managed standby database disconnect from session; |
Configuration and usage of dgmgrl
When first starting dgmgrl and creating the configuration you will get the following error :
This is because dgmgrl should be activated on both primary and standby database :
oracle [ /u01/app/oracle/product/11.2.0.3/dbhome_1/dbs ]$ sqlplus / as sysdbaSQL> show parameter brokerNAME TYPE VALUE------------------------------------ ----------- ------------------------------dg_broker_config_file1 string /u01/app/oracle/product/11.2.0 .3/dbhome_1/dbs/dr1PRIMARY_DB.da tdg_broker_config_file2 string /u01/app/oracle/product/11.2.0 .3/dbhome_1/dbs/dr2PRIMARY_DB.da tdg_broker_start boolean FALSESQL> alter system set dg_broker_start=true;System altered.SQL> |
Next you will be able to create the initial configuration :
oracle [ /u01/app/oracle/product/11.2.0.3/dbhome_1/dbs ]$ dgmgrlDGMGRL for Linux: Version 11.2.0.3.0 - 64bit ProductionCopyright (c) 2000, 2009, Oracle. All rights reserved.Welcome to DGMGRL, type "help" for information.DGMGRL> connect sys/<Password>Connected.DGMGRL> show configurationORA-16532: Data Guard broker configuration does not existConfiguration details cannot be determined by DGMGRLDGMGRL> create configuration 'PRIMARY_DB_DR'> as> primary database is 'PRIMARY_DB'> connect identifier is 'PRIMARY_DB';Configuration "PRIMARY_DB_DR" created with primary database "PRIMARY_DB"DGMGRL> show configurationConfiguration - PRIMARY_DB_DR Protection Mode: MaxPerformance Databases: PRIMARY_DB - Primary databaseFast-Start Failover: DISABLEDConfiguration Status:DISABLEDDGMGRL> add database 'STANDBY_DB'> as> connect identifier is 'STANDBY_DB';Database "STANDBY_DB" addedDGMGRL> show configurationConfiguration - PRIMARY_DB_DR Protection Mode: MaxPerformance Databases: PRIMARY_DB - Primary database STANDBY_DB - Physical standby databaseFast-Start Failover: DISABLEDConfiguration Status:DISABLEDDGMGRL> enable configuration;Enabled.DGMGRL> show configurationConfiguration - PRIMARY_DB_DR Protection Mode: MaxPerformance Databases: PRIMARY_DB - Primary database STANDBY_DB - Physical standby databaseFast-Start Failover: DISABLEDConfiguration Status:SUCCESSDGMGRL> show database PRIMARY_DBObject "primary_db" was not foundDGMGRL> show database 'PRIMARY_DB'Database - PRIMARY_DB Role: PRIMARY Intended State: TRANSPORT-ON Instance(s): PRIMARY_DBDatabase Status:SUCCESSDGMGRL> show database 'STANDBY_DB';Database - STANDBY_DB Role: PHYSICAL STANDBY Intended State: APPLY-ON Transport Lag: 0 seconds Apply Lag: 0 seconds Real Time Query: OFF Instance(s): STANDBY_DBDatabase Status:SUCCESS |
Next you should be able to perform a switchover :
DGMGRL> switchover to 'PRIMARY_DB';Performing switchover NOW, please wait...New primary database "PRIMARY_DB" is opening...Operation requires shutdown of instance "STANDBY_DB" on database "STANDBY_DB"Shutting down instance "STANDBY_DB"...ORACLE instance shut down.Operation requires startup of instance "STANDBY_DB" on database "STANDBY_DB"Starting instance "STANDBY_DB"...ORA-32004: obsolete or deprecated parameter(s) specified for RDBMS instanceORACLE instance started.Database mounted.Switchover succeeded, new primary is "PRIMARY_DB"DGMGRL> show configurationConfiguration - PRIMARY_DB_DR Protection Mode: MaxPerformance Databases: PRIMARY_DB - Primary database FLEETTST_STBY - Physical standby databaseFast-Start Failover: DISABLEDConfiguration Status:SUCCESSDGMGRL> exit |
Known issues
On the standby database issue the following :
Related articles
Step by Step Guide on Creating Physical Standby Using RMAN DUPLICATE...FROM ACTIVE DATABASE (Doc ID 1075908.1)
Abonneren op:
Posts (Atom)